This is the second part of the article covering an end-to-end example of a cross domain inter-operationality between an Oracle SOA for Healthcare Integration (SSHI) and SOA Back-End domain. This part delivers a step by step guide to implement the required Oracle SOA for Healthcare Integration (SSHI) configuration.
Please have in mind that the SSHI configuration is held on the SSHI Domain - Domain A.
Create the HL7 Document
In the Part 3 of this article a SSHI repository will be delivered containing the configuration here described, however, this part also covers the creation of documents in the Oracle Document Editor to address the overall end to end process of SSHI configuration.
This part is optional if you plan to use either the Oracle HL7 Libraries or the repository provided in the Part 3 of this article.


Activate the Interface Sequencing (this is optional and depends on which type of sequencing to implement, even if sequencing should be active at all. SSHI sequencing options will be addressed by in future posts)
Immediate ACK should be set to Default and HL7 ACK set to None. All other values left as default.


Change to Advance Tab


Please have in mind that the SSHI configuration is held on the SSHI Domain - Domain A.
Healthcare Configuration (SSHI)
An Healthcare integration with SSHI consists in:
- Creation of HL7 Documents
- Creation of endpoints, establishing the inbound and outbound MLLP channels
- Creation of Internal Delivery Channels using the created JMS at the Part 1 of this article
Create the HL7 Document
In the Part 3 of this article a SSHI repository will be delivered containing the configuration here described, however, this part also covers the creation of documents in the Oracle Document Editor to address the overall end to end process of SSHI configuration.
This part is optional if you plan to use either the Oracle HL7 Libraries or the repository provided in the Part 3 of this article.
With Oracle Document Editor you can create and use document definitions that will be used by the SSHI to create new documents to be exchange between endpoints. For this exercise, lets create an HL7, ADT 03 on version 2.6
Create new document

Select the protocol HL7, version 2.6 and ADT A03 as document type

No changes will be introduced to the standard, so, export the definition as ecs and xsd to be loaded by the SHHI when creating a new SSHI document

Export the xsd as Oracle 2.0

As this is a sample implementation, select all default options and save the definition. On the end, you will have a ecs and xsd file.
Now, at the SSHI console, lets use this artifacts to create a new document. When at the healthcare console, navigate to Designer, select configuration and, if not existent yet, create the HL7 Protocol, version 2.6 and new document type ADT_A03 - all options as default.

It is time to create a new document definition with the name as ADT_A03_def, import the xsd and ecs created by the document editor and leave all other parameters as default

Note: You will also note that for the construction of the outbound endpoint a Ack message will be requested. In case of need, replicate the same steps above for an Ack message for version 2.6.
Create the Internal Delivery Channels
In order to use the created JMS queues for interface type between domains it is required to create Internal Delivery Channels, both for inbound and outbound.
For that, switch to the Administration tab in the Designer. In there you will find two folders:
Send to Internal - Send messages from SSHI to Back-end Composite though the inbound JMS Queue
Receive from Internal - Send messages from SSHI to Back-end Composite though the outbound JMS Queue
Starting by the Send to Internal:

Create a new JMS Internal Delivery Channel and fill:
Name - IC_SSHI_INBOUND
Destination name (the inbound queue name) - jms/hc/SSHIInboundQueue
Connection Factory (the connection factory name) - jms/hc/SSHIInboundCF

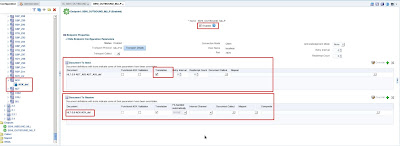
Click OK. Back to the Internal Channel landing page select Transport Details.Switch to Advance tab and provide:
Destination Provider: java.naming.factory.initial=weblogic.jndi.WLInitialContextFactory;java.naming.provider.url=t3://soa1-host:soa-port (replace this value by the hostname and SOA Port for the SOA Domain)
Note: In case of communicating with a clustered SOA Domain, provide all SOA managed servers hosts separated by "," e.g. java.naming.factory.initial=weblogic.jndi.WLInitialContextFactory;java.naming.provider.url=t3://soa1-host:soa-port,soa2-host:soa-port
User Name: SOA Domain User (e.g. weblogic)
Password: SOA Domain User password
*Confirm Password must be also filled and corresponding to Password
Sequencing: Deactivated (More information about sequencing options may be found at the official SSHI Oracle documentation)

Now, the Receiving from Internal
Create a new Internal Delivery Channel and set Transport Protocol as JMS and fill:
Name - IC_SSHI_OUTBOUND
Destination name (the inbound queue name) - jms/hc/SSHIOutboundQueue
Connection Factory (the connection factory name) - jms/hc/SSHIOutboundCF

Click OK. Back to the Internal Channel landing page select Transport Details.Switch to Advance tab and provide:
Destination Provider: java.naming.factory.initial=weblogic.jndi.WLInitialContextFactory;java.naming.provider.url=t3://soa1-host:soa-port (replace this value by the hostname and SOA Port for the SOA Domain)
Note: In case of communicating with a clustered SOA Domain, provide all SOA managed servers hosts separated by "," e.g. java.naming.factory.initial=weblogic.jndi.WLInitialContextFactory;java.naming.provider.url=t3://soa1-host:soa-port,soa2-host:soa-port
User Name: SOA Domain User (e.g. weblogic)
Password: SOA Domain User password
Confirm Password must be also filled and corresponding to Password
Sequencing: Deactivated (More information about sequencing options may be found at the official SSHI Oracle documentation)

Having the documents and internal delivery channel created is time to create the two sample endpoints, one for inbound, another for the outbound.
Create the Endpoints
Lets start by creating the inbound MLLP endpoint.
From the Endpoints folder, right click and select Create
Introduce the following details:
Name: SSHI_INBOUND_MLLP
Transport Protocol: MLLP10
Connection Mode: Server (will receive messages)
Hostname: localhost or the host name of the SSHI Domain (Domain A)
Port Name: 6565
After clicking OK, the endpoint is created, however its necessary to change some configurations. For that, select the Transport Details options
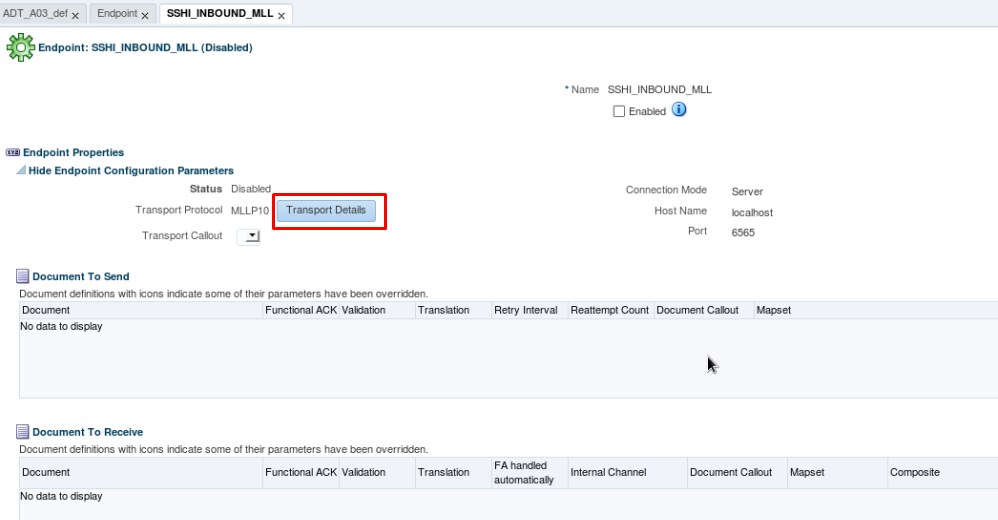
Change to Advance Tab

Activate the Interface Sequencing (this is optional and depends on which type of sequencing to implement, even if sequencing should be active at all. SSHI sequencing options will be addressed by in future posts)
Immediate ACK should be set to Default and HL7 ACK set to None. All other values left as default.

Its now necessary to define which documents can be handled by the endpoint. Since it is an inbound endpoint, the created ADT_A03 document will be accepted by the endpoint.
For that, while with the endpoint screen open, select the ADT_A03 document from the Document tree and drag and drop it in the Documents to Receive area of the Endpoint screen.

Important step is to be sure that the IC_SSHI_INBOUND Internal Delivery Channel is configured as value for the Internal Channel options dropbox.

Tick the option Enabled and save the endpoint. The inbound should be now active and reachable.
Now, create an outbound endpoint
This time as client, since it will connect to a external MLLP Server
Name: SSHI_OUTBOUND_MLLP
Transport Protocol: MLLP10
Connection Mode: Client (will send messages to an MLLP Server)
Hostname: hostname of the MLLP Server
Port Name: Port of the MLLP Server
After clicking OK, the endpoint is created, however it is necessary to change some configurations. For that, select the Transport Details options

Change to Advance Tab

This time the interface sequencing should be deactivated since for this case the interface sequencing will be established at the inbound endpoint level.
It is now time to define which documents can be handled by the endpoint. Since it is an outbound endpoint, the created ADT_A03 document will be sent by the endpoint.
For that, while with the endpoint screen open, select the ADT_A03 document from the Document tree and drag and drop it in the Document to Send area of the Endpoint screen.

Being an Outbound endpoint, it needs to be configured to accept HL7 acknowledge documents back from the HAPI MLLP server.
Due to that, an Ack document should be added to the Receiving documents list of the endpoint. This time not necessary to map to any Internal Delivery Channel since the Ack message will be discarded.

Be sure that both are with translation option active, tick the option Enabled and save the endpoint. The inbound should be now active and ready to send HL7 documents.
All the configuration on the SSHI (Domain A) are now complete. It is time to address the back-end composite application to be deployed and used from SOA Domain (Domain B) on the third and last part of this article.